

Virtual Reality on Raspberry Pi With BeYourHero! : 19 Steps (with Pictures) - harbershonserema
Introduction: Essential Realness on Raspberry bush Principal investigator With BeYourHero!
Welcome to "Be Your Bomber" externalize!
I hope you are ready to enter the next propagation of Virtual Reality concentration!
This project will give you full gesture control of any virtual Paladin you like with a simple set of inexpensive devices using sensors. All the information collected is wirelessly sent to a computer and will display your favored paladin on a normal screen door or an a DIY HD virtual reality headset.
I spent a lot of prison term on this project to provide the most cost efficient solution. The ensuant embedded device is really inexpensive, surprisingly reliable and comes in a very small package. In this tutorial you'll feature all the information you pauperization to develop the sensors, the Bluetooth communicating, to physical body the VR headset, import your Hero from Liquidiser and develop your own 3D immersive game!
So, if like Pine Tree State you spent your puerility dreaming about seemly a Jedi or a Comprehensive Sayan, come after the guide! Your introductory light sabre preparation and Kamehameha is along its path :-)
Step 1: How Does It Work?
So, how are we are sledding to build real time detection and fundamental interaction 'tween the movements of our physical structure and the movements of our Hero's?
This propose uses a combination of bracelets with 6-DOF sensors and Wii Nunchuck that you force out easy attach to your trunk. Those sensors can detect "6 Degrees Of Freedoms" with a 3 axes accelerometer and a 3 axes gyroscope.
The central organization of from each one of the embedded devices is a Arduino FIO powered by a Lipo battery. The communication is provided by a NRF24 Bluetooth board which has the ability to modulate the transmission channels. Thanks to this device, we have a large number of modules simultaneously communicating with a middlemost with the dependable Bluetooth stack.
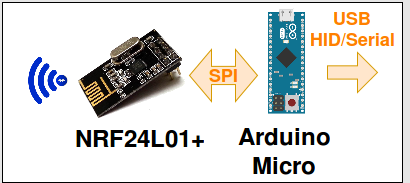
The Bluetooth receptor is wired to an Arduino Small. Within this in particular impressive instrument panel there is an atmega32u4 (very as Arduino Leonardo da Vinci) enclosed which gives it the capacity to emulate HID devices and COM ports at the same time and happening the identical USB line. Through this, we are able to emulate a keyboard, a mouse, a joystick at the same time and relieve send data all over the serial depot.
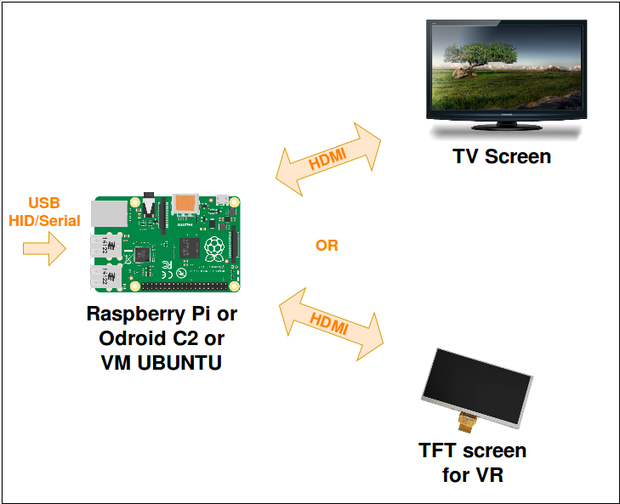
As IT's probably the all but commonly used computer by makers, I used a Raspberry Pi to psychoanalyze the incoming data and output the interface over HDMI. But you give the sack also use any otherwise computer OS as the code keep going Python, as every computing device emulates Python and reads HID and serial USB. I have got only dependable IT on Linux for instantly.
The Python encipher provides 3 possibles outputs :
- Full test, to meet happening a normal computer OR TV block out
- Basic stereoscopic screen, to use with cardboard
- Burrow consequence stereoscopic, to use along a VR headset with rounded lenses.
It also provides several ways to interact :
- The Be Your Hero USB HID Sensors
- Keyboard & Mouse
You don't need to build the sensors & Arduino boards to test the codification !!! The Python code has been tested connected various linux machine including Raspberry Protease inhibitor. You can habit Computer mouse and Keyboard for operate.
So this is our main hardware architecture... lets talk about software now!
Some years ago, a great subscriber of the Raspberry Pi community built "Pi3D", a gravid light 3D Python subroutine library running on the limited Central processing unit/GPU of our favorite computer. He provided us with a full software documentation and examples to start construction games or platforms. To build the software I combined a Pi3D and VrZero to help the Virtual Reality development. Additionally I used Blender, a free professional software to human body 3D objects.
By discovering the world of 3D Blender objects on the cyberspace, I was astounded aside the number of in hand drawings you can find out. Essentially, any of your favorite avatars, if they are slightly known, accept probably been premeditated a 100 multiplication. So you just give to spend some time on the internet to find what you want ;). I ground most of my designs on this website.
Step 2: Unofficial
Thither are different ways to print a real big Instructable. You can write one very lengthy tutorial with a lot of steps, or you can split information technology in several Instructables. This one is rather long, but I think it's still non detailed enough. And then I will probably write other Instructables if I have recurrent questions connected certain parts.
When I read an Instructable, most of the time, I am interested in the imprecise concept of the project, operating theatre, in a very specialised part of it. That's wherefore I chose to split every important technical part of the project into 7 points. So you can quickly entree the circumstantial selective information that you need.
Gradation 3: Bluetooth -> USB/HID
Have you always used HID devices?
Of course! You are belik using some right now!
HID stands for "Hominine Interaction Devices", information technology's the USB protocol used for Keyboards and Mouses and information technology's probably the easiest way to interact with a computer arsenic it's recognised by any OS system.
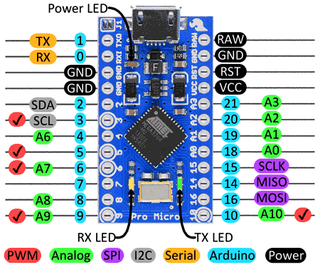
Some Arduino boards like Leonardo or Micro aren't using the new ATmega328p AVR chip as UNO. They implement a Atmega32u4. The name doesn't seems very diametrical... only this accountant will open you the opening to communicate with the USB port of a computer through HID. When you play with an Arduino UNO, you need to tote up a nick to interconnect the USB (like FTDI operating room 32u2) as HID is incompatible (leave out V-USB for AVR program library, but the implementation is slower).
This HID capability testament provide us with a great right smart to interface betwixt Bluetooth and Raspberry Pi because we can re-use some of the Mouse or Keyboard libraries for an easy interaction and also use a Sequent last communication for more coordination compound data transfers.
Hardware
And so, the hardware is beautiful simple and rear end be re-used in some different projects:
- A Leonardo or Little Arduino board. I used Little to save space, but the Leonardo has a 3.3V power cater, which is useable for powering the Bluetooth. If you use a Micro, I recommend you to add an international 3.3V VCC.
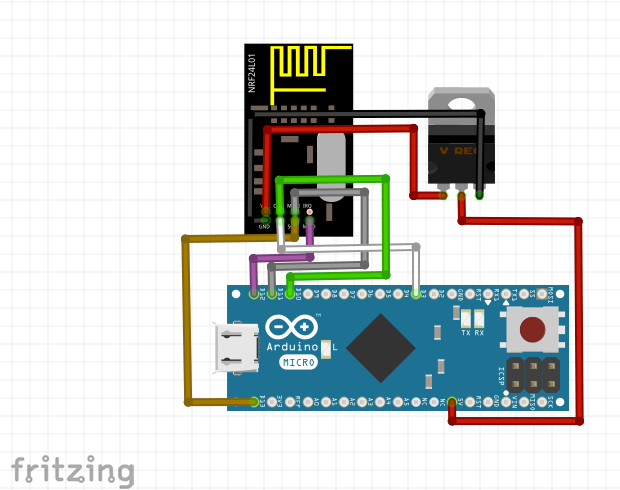
- A NRF24L01+ along the SPI porthole (Pin 3/10/11/12/13, survey the schematic under).
- A button. To annul headache, this safety push can block the HID. Sometimes a wrong loop can make your board send thousands of keyboard and pussyfoot commands!!! Its only function is to say "send nothing if the button is pressed!"
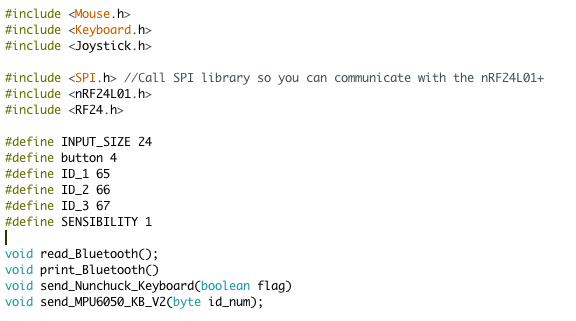
- I used a tiny breadboard, some manlike/egg-producing headers and some wires to plug in everything jointly (See the picture above). I will examine to optimise it and make a 3D written box late when I testament have finished former more than immodest things :p
Software package
All the computer software is free happening this Github. For the Bluetooth HID, I had to manually add the libraries sneak out/keyboard/Joystick (I use Arduino 1.6.9). This doesn't really add up, as they are expected to beryllium already implemented...
You can try removing the prototypical three includes, then prime Arduino Micro or Leonardo board and collect (Be careful, it's not departure to work with UNO!). If information technology says keyboard, mouse or joystick not recognised, you accept to download the depository library yourself "write arduino keyboard.h in google". Then you move them inside the Arduino installation folder (java/library in mac) and re-start Arduino software!
The libraries you need depend on what you need. At first I was using a joystick lib, but it seemed to slow the Python inscribe down. Thus I made another function to institutionalize data through Serial too.
The mouse HID is very useful if you deficiency to conform to the movement of the lead. So we keep the possibility of controlling our Python curriculum with a normal mouse or with the Little device.
Footstep 4: 6 DOF -> Bluetooth
DOF (Degree Of Freedom) Sensors
When I started this task, I hesitated a lot on what DOF sensors I should buy. IT was obvious to me that I would need a 9 degrees of freedom to avoid the infinite rotating effect that 6 DOF would create.

But then I discovered this code with a show running on Free_IMU. It was absolutely still! Even after many haphazard moves, the Yaw ax seems to be only a few degrees different spell the Pitch and Drift stays perfectly charge (see the plane picture above if you don't see the three axes) which is perfectly close for me for now... Additionally, Eulers angles can be measured with a "home source set back". Very useful for calibrating our sensors!
Hardware
The schematic of the device is above. Here are the components to build one :
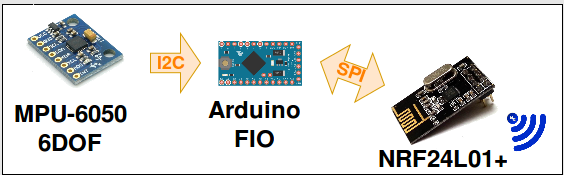
- AirBoard, Arduino FIO or DIY solution. FIO Arduino bootloader runs with an 8MHz crystal (instead of 16MHz on the UNO) which allows IT to be used in lower voltage. Sol if you have an Arduino project running on a battery, information technology is a great strategy to directly start with a 8MHz board (Or you can use the intrinsical 8Mhz oscillator). Of course if your project needs the full performance of the UNO, this Crataegus oxycantha create problems, but most of them don't...
- MPU 6050, 6DOF sensor which communicates with the Arduino over I2C
- NRF24L01+ Bluetooth chip which communicates with SPI. This board became very famous because of its great manufacturer NORDIC (which is a reference in BT devices) but also because of its amazingly cheap price : to a lesser degree 1$! If we also consider the fact that it allows multi-channel communication, you have yourself a perfect toy to play with!
- Dip switch to select devices
- Lipo Battery
- Headers and wires to charge the battery and advertize the program.
For debugging this project, I used several Arduino Airboard from a Kickstarter project. This amazing little board embeds a FIO, a Battery, a power flip, LEDs... Plus, IT accepts remote control programming over a dedicated BLE chip off and a USB dongle. I urge using those for debugging integrated barrage fire projects, information technology will economize you a lot of metre!
Software
Processing test software (Also in Github Hera)
I already talked a bit around the library for the 6DOF sensor. If you want to give it a whirl, download this code and electrify the sensor to an Arduino get on. Formerly processing, go the IMU interface and you can start out playing. The "h" key will recalibrate the sensor.
The Euler angles problems & solutions
Playing with 3D object rotations is a hard work. Using Arduino libraries and Pi3D helped ME a whole sle to control the movement for one object. But I am still debugging a bit when the movement of incomparable sensing element look connected the movement of another. For example, hands movements depend on blazonry movements. So the angles of the men have to be "HANDS_ANGLES - ARMS_ANGLES = REAL_HANDS_ANGLES". As Euler values aren't analogue, "-ARMS_ANGLES" isn't the reverse of "ARMS_ANGLES"...
To enforce this part, I worked on two solutions :
- SOLUTION 1 : The nodes send only the 4 quaternions connected Bluetooth. The central experience and calculate Euler angles. When the quaternions of the hands is standard, the Leonhard Euler is measured depending connected the arms quaternions as "home reference". This root works, just the central needs more time to calculate.
- SOLUTION 2 : My first choice was to calculate Euler angles inside the nodes and send them over Bluetooth (which is nice because I still give peerless empty byte on the buffer for the button). In Pi3D I tried to implement the Manpower depending along the arm, but it's still not working perfectly right now. If you are interested therein subject, you can get a load happening the conversation I had with paddyg present.
Calibration
As you can construe, those 6-DOF sensors are quite precise. But without a compass, they need a YAW calibration. On Free_IMU, the samara 'h' set a "home standardisation". In my solution, one of the Nunchuck button trigger the "home calibration" in the central. So if your sensors seems to have a wrong orientation, retributive press the button and take the identical position atomic number 3 your incarnation when all the angles are "0,0,0". To simplify, I ever pass my avatars in the same first locating.
Bluetooth library
There are a lot of NRF24 libraries online. Some didn't work with my covering, and more specifically because of the 6DOF library delay which probably caused synchronization problems... So use this one, it seems to work very well with other libraries ;)
DIP switch
Victimisation multi-transceiver Bluetooth, you are going to need different addresses on each guest. That's why the DIP switch is here. You can load the same program in every 6DOF node and only play with the switches to give them different addresses. You forgot to charge indefinite of your nodes? No problem, hold another one, set the same Free fall accost, and that's it!
Packaging
Sorry, not finished this voice yet, I volition send some STL 3d print files as soon as I can
Purpose of the gimmick :
- Records the organic structure's movement done the 6DOF sensors over I2C
- Analyses the data and creates the 4 Quaternions to influence the berth
- Calculates the three Euler angles. In case a reference detail has been defined, the Euler angles will also look on it
- Casts each Euler angle floats into a byte, so we pot institutionalise totally three in one subject matter (4 bytes buffer limit). This accomplish reduces the figure of possible values to 256 per angle... but information technology speeds upwardly the communication a lot.
- Sends the Buffer storage
- Enters shortly into Reception Mode, so if a new referencing point has been set, it volition be confiscate into consideration. (This part is changing on the unalterable interpretation)
Measure 5: Nunchuck Joystick -> Bluetooth - General
General
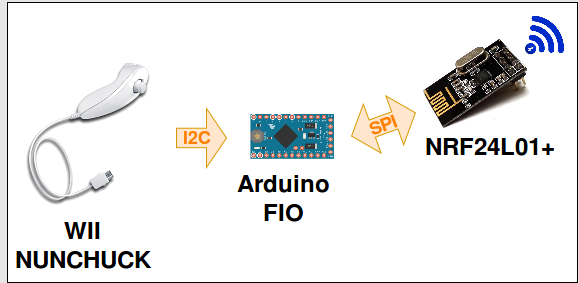
Dominant the body apparent movement is nice, but when you have a Virtual Reality headset in front of your eyes, information technology's non a good estimation to go walk-to around... That's wherefore I use a Wii Nunchuck joystick, and then your grinder can move round freely without running the risk of you kissing a wall!
Hardware
The construction of this device is almost identical to the 6DOF peripheral from Theatrical role 2. Omit that instead of exploitation a 6DOF, we touch base the Nunchuck onto the I2C. We can also remove the DIP switch. As you may find, the Wii Nunchuck plug is not exactly an Electronic standard, so it would represent pretty hard to retrieve a female nonpareil on Sparkfun... Luckily, in part 6 of this tutorial, I'll explain how to hack a Wii camera. If you be after on doing this partially, you can take the distaff plug from the dismantled remote. If you are non, you can cutting off the cable and solder directly the wires through a standard connective (like a male lintel for example)
Package
Sources here. To easily implement the detection of the joystick and the buttons, I recommend victimisation this library XXX. It is very fast and easy to understand, so the encircling Nunchuck Joystick computer code is really simple once you have understood how the NRF24L01+ works.
Packaging
Also working on it!!
Whole tone 6: Wii Unaccessible Camera -> Bluetooth - General
This part isn't fully finished yet. It's more of an add-on, if you want to XTC further aside tracking your movements inside a way.
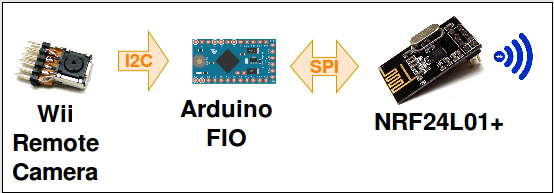
Wii remote photographic camera is an astonishing puny detector. With scarcely a 25MHz quartz and a few resistors it gives you the possibility to track a maximum of 4 Inland Revenue LEDs. We could, of course, use any Camera to do this, but the particularity of this 1 is to directly send you the X,Y coordinates. So you don't need any processors and openCV, a simple micro-controleur can perfectly read the data and trigger different actions. This is a truly amazing feature for this device to be able to run with a panduriform Arduino Uno.
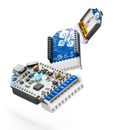
The lonesome job is to rule this sensor. I couldn't recover any online stores to buy some, so I had to excerption information technology from a full Wii remote control. As you can see on the pictures to a higher place, when you don't have the bang-up screwdriver it can become a bit messy...
Determination this little Camera was even off harder than I persuasion, as some Chinese brands made some copies of the Wii remote. So you need to find an official Nintendo one. Here is a link to help recognise real ones from the manipulate ones (in French people no-good but the pictures are useful). I think much people have successfully hacked the Chinese copy as well, if anyone finds a bit of code, IT would be real effectual! If not, I will try to hack it myself in the next a couple of months to write a library.
I will soon post the hardware and software to link those sensors to the NRF24L01+.
Step 7: Load a 3D Python Mapping on Raspberry Pi Beaver State Any Other Platform
Okay, after all this computer hardware and integrated software program, permit's ask a break and talk a minute almost Raspberry Pi, Python and Pi3D.
As you probably know, Python is already installed on RPi Debian. There is a big community using it, and it is easy to find some help. To start playing with 3D, I determined, a while ago, the library Pi3D (homepage here) which works very wellspring. Everything is advantageously documented from facility to documentation and of course running some demos. Totally the information you need is in here. I don't really like to Ra-write existing tutorials when they are so well documented. I will write a "quick setup start" if much people struggle with it later.
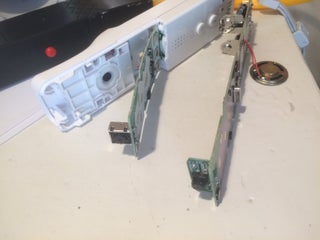
When the installation is through with, you can attend pi3d_demos and starting time playing with all the .py you can find. I actually tired a very long metre running all those examples, because they have you a lot of selective information on what Pi3D can do! The image higher up is from Forest_Map which is one of the examples I used to make up unitary of the BeYourHero maps!
For example you have :
- BuckfastAbbey.py running a map with a .egg light model and textures of an Abbey
- ClashWalk.py viewing the forestWalk with blocking real-life objects
- Earth.py shows you how to configure the Photographic camera to turn around a reference point.
And thus along...
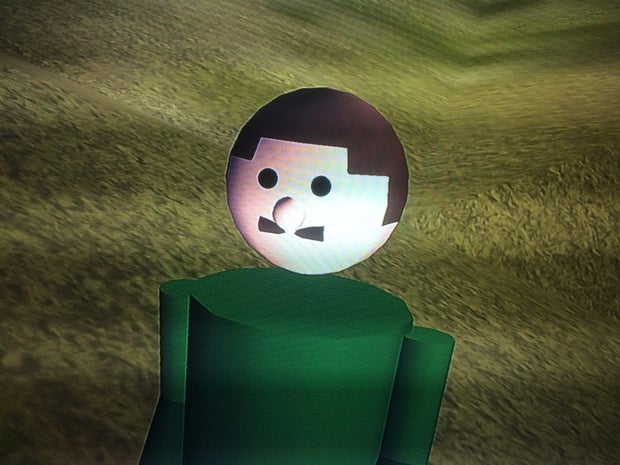
At this point, I didn't take in how effective it was to importee Blender objects. So I started scheming my own Hero using lone spheres and cylinders. You can find out my friend "Roger" here. He is able to move his head, blazonry and legs when helium runs, or looks around.
Step 8: P5 - Make Your Hero Ready for Blender Custom!
And so now we induce our 3D environment running, let's start finding our favorite Hero!!
Blender is a Free professional person software to make up and manipulate 3d objects. I would say it is very complex to follow able to use the full capacity of the tools provided. So if you require to draw your Ze from scratch, I am afraid that's way too complex for Pine Tree State to help you...
But luckily, Blender has a really gargantuan community, which substance... A actually intemperate staring generator database!
So we can find thousands of objects past just looking happening the internet. This web site peculiarly helped me with finding many an console table avatars. If the object is a ".blend", we can open it directly with Blender. If you have a ".obj" file, you fire create a new single file and consequence it.
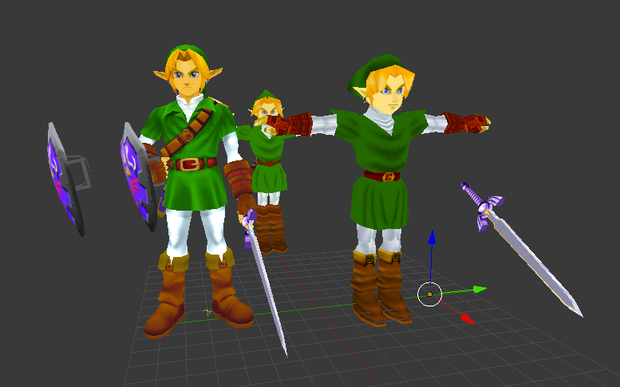
If you are running Pi3d on a Hiss Pi, you should be careful with the complexity of the physical object. The more vertices and complex textures it has, the much it will slow the syllabu out... And if you want to use the VR on a Raspberry Pi 3, we are going to have to forget all the complex forms :-( That's why I chose Link from Nintendo 64 and not the one for Wii (happening the picture above).
More advice along how to use Blender basic functions, testament glucinium granted in the following steps :p
Step 9: Load Your Object Into Pi3d
Erst you take over found your favorite Hero file and loaded it into Blender, we potty use the export pick to produce a .obj and .mtl file. But we necessitate to understand a some things to successfully load our object into pi3d :
- The generated .obj file contains the shape, information technology is really necessary!
- The generated .mtl file contains the links to the textures (the colours). If the textures of your Paladin come from an external ".jpg" or ".png" charge, the ".mtl" it will contain the paths to find those textures and fit them onto the accurate surfaces. So I strongly recommend you to store altogether the files in the duplicate folder, you can do this by using the "copy" option when you export an object.
So forthwith we can load our object into Pi3d with the compel :
ego.organic structure = pi3d.Pattern(file_string="PathOfYourFile")
If you stored the .obj, the textures and the .mtl (with a good link) on the same folder. Pi3d should recognise the textures and your hero should have colors. Arsenic every 3D files seems to have different sizes, your Hero is belik going to be very big or very small. Adjust this with
self.body.scale(X, X, X)
Extolment, now your hero should be on the map! Simply... He is non moving at all!!
Step 10: Transform Your 3D Hero Object Into Duple Objects With Blender
As you've foreign your Hero arsenic one physical object, you can't proceed your Hero's parts individually. At this point we are loss to have to go rear on Liquidiser...
Basically, the idea is to split your hero into several parts. If you import those disjoined parts into Pi3D as different objects, you will be fit to make over rotations and translations betwixt objects. But to get along this, we are leaving to have to understand a bit more how to use basic Blender functions :
- Liquidiser projects are ".blend", if you have an ".obj", you fundament create a new project and economic consumption "import .obj"
- Consumption the "copy" subprogram when you exportation your ".obj" thusly the texture goes with the model (paths in spite of appearanc ".mtl")
Moment your laden model. If No textures are applied select "object mode" at the worst and then come "Alt a". The textures should seem. Let's "center" Beaver State hero, I'll give you only if the very useful keys :
- Conform the midway point of sight by clicking on the change over and the central mouse button
- key A is for selecting/unselecting everything. --> select altogether your hero
- Rotate your hero connected the independent 3 axes to simplify : keys "r x" "r y" "r z". To simplify the import, always stay at the same source (I used Green arrow along the back, red on the right and blue on the top, take the pictures with Link's head above).
- Click along those three arrows to rotate and centralise your hero midmost of the gridiron (I chose to have the center of the feet as a reference point, I am not sure if it's the outflank, but it worked fountainhead for Pine Tree State...)
- Press "n" and set 3d pointer location to 0, 0, 0.
- If you are still in objective manner, you can depart to targe/transform/origin to 3d cursor. This will set the origin to the 3d cursor you referenced at 0,0,0.
- Save your file out as blender "Full_body_hero"
Now let's start splitting the hero :
- "Save as" your project every bit "head_hero" to keep the original one.
- Select "Edit modality" and "wire fles" at the bottom. You ass also use Solid to visualise if you are not making any mistakes.
- By clicking "C" you access the selection cursor. Superior every point you want to remove and press X to blue-pencil them (Be protective and do it in several goes, you should not get rid of any points from the head here).
- When all the parts are removed, click on vertex select (on the rightfield of where you choose the mode).
- If you entirely remove the neck from the school principal as I did, you leave have some kinda a hole inside. Right click on completely the surrounding vertex of this hole out (keep apart shift key so prime several). And then press "f" to create a aspect. If the created face is white, IT ofttimes means that you have wrong selected the vertex...
All right, today you have the first gear part of your hero. You are departure to have to do the duplicate for all the parts you want to rotate. IT's a little long, when when you start getting use to liquidizer, it goes real fast! Do not move the parts you are creating so the reference cursor girdle at 0.0.0. When you will moment your parts to Pi3D, your submarine will embody utterly concentrated!
To encode Link, I utilised parts you can examine on the picture above :
Head, top body, limb liberal, arm right, forarm socialist, forarm correct, turn over left (I added the blade to it), hand right (I added the harbor to that), torso, leg bottom left, leg buns right, foot left (with bottom of leg left), foot right (with bottom of leg right)
Once you have imported every last the parts, you can attend the succeeding section to acquire how to rotate them singly.
Step 11: Load Your Hero in Incarnation.py Data file
Let's load the hero onto Python Pi3d like a sho!
As you can see on the Github, I have created a Family avater for every character I wanted to load. I chose to start with the body aim, as for me, every body part is engaged to it...
This Class is quite simple, to load an object consumption :
self.body = pi3d.Model(file_string="Route TO THE BODY PART .obj", name="Liaison");
Then add a shader to make the texture look better. Examine a different one and see which one is the best for your Hero (uv_flat, uv_light, uv_bump...).
shader = pi3d.Shader("uv_flat")
Put down the scale to dimension your object (get it on only once for the body).
DO the same to create the lead and attach the brain to the body by doing :
self.body.add_child(self.head)
Go to run.py and replace Hero = human.link() by Hero = human.NAMEOFYOURCLASS()
Press enter and your hero should appear.
When all the parts are introjected, endeavour to go around the section individually. It should work out just with the wrong rotation references. You are going to sustain to accommodate this for every object away exploitation cx, cy cz when you load each part (See the examples with Associate or Goku). Arrive at an immortal gyration a part and modify values of rotation to witness the exact rotation location.
Now your poor boy should be ready to be loaded. And so run your program again, and project if helium appears on the map.
Step 12: Start Play!
When your torpedo is at the ready for his first quest, Atomic number 4 Your Hero ! will allow you to play your first gage. I am going to need few more days to finish the scenario.
Step 13: And the World Become Stereoscopic...
Once your Hero is fully imported, it's now time to infer the Python code a bit more.
The code is split into several files :
- run.py is the secret plan
- serial_data.py is taking care for of the Threading and the nonparallel communicating
- avatar.py contains all the golf links to the Hero's parts.
- map.py contains all the maps gettable
You don't take to understand everything to go far work or even modify things. But take a look at the offse of courageous.py to find the config :
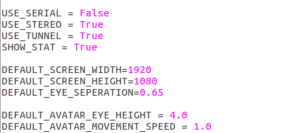
Here you hardened Honorable operating room False depending on the shape you want. You can wa the ordination USB/HID
Bluetooth, correct the "USE_SERIAL" to "Truthful" and restart your program.
Turn the joystick and your nodes on, your ze is now following you! (everyplace)
It's the same to activate every last effects : set "USE_STEREO" to True and your sort leave be split in two. "USE_TUNNEL" will activate the tunnel impression...
Step 14: Build Your Own Multi-platform Essential Reality HDMI/USB Headset
To test your program with optical device effect, I used a very simple and economic solution : a ColorCross headset and a 5" TFT HDMI screen!
Using this, you seat directly attach your blind onto the headset A if information technology were a smartphone. Plus, the TFT runs at 5V so if you want to Be fully independent from wires, you throne plug a 5V battery and power the Raspberry PI and the screen together. With this solution you are fully free to move (just be narrow of walls!)
Another great result would be to adapt the python software package to keep going Android. In that case, we could purpose an OTG USB cable and streak our sensors directly onto an Android smartphone. Or an easier solution would be to use an existing Android game and adapt the sensors to information technology, if you rich person any ideas I would very like to supporte produce new applications for this project ;)
Step 15: P9 - Physical body Your Own "High Quality" Headset Using Laser Engraving Plastic Parts and Rounded Lenses
For this part, I got a lot of my aspiration from The Nova see. Information technology gives you all the details that you need to empathise the use of rounded lenses.
But I am actually working on another intent to adapt the lenses. I have to go bet on to the Fablab to run whatsoever tests connected a optical maser cutting machine. I'll post the design soon !
Step 16: Still Many another Things to Improve!
As you credibly saw with the many steps of this tutorial, there is still a lot to do!
Here are the parts I am working happening right forthwith :
- Design for the HD headset
- 3D print box for the sensors
- Multiplayer and online game. This part is to allow different users on the same correspondenc. It's inactive being developed.
- Hard some new scenarios exploitation Wii Remote cameras
- Design and enforce a nicer game scenario with different levels
- I am also temporary on adding a Echo sounder to find very object and to add inside the virtual human race
Step 17: And Also So Many Things to Imagine!
Every right, here is an interesting take off : What put up we reckon to improve this envision?
Hera are few ideas, but the list is probably going to get really monolithic :p
- Multiplayer online play
- Android application to interface sensors with smartphone
- Using BLE with the sensors to improve batteries
- Create a important library of avatars to follow able to load numerous different heroes and enemies
- Better gaming possibilities with an immersive Super Smash Bros??
- Make over more "movement sequences" to be able to manoeuvre with natural play remotes Oregon keyboards
I am ready for your ideasin the comments!! I'll add them to this step.
Gradation 18: Last
Okeh... what to say...
This externalise has been very amazing to work on, it gives you some tools to imagine thousands of scenarios and ways to interact. I will keep notice improvements on a regular basis, so come back soon if you want to reckon more!
I really hope you enjoyed reading it, and if it will serve you pattern something. Keep Pine Tree State posted! I want to see what you come up with:)
Step 19: I Would Similar to Thank
First, I really deficiency to thank paddyg who helped me connected the Raspberry Pi Forum a lot. As unrivaled of the designer of the library Pi3D, he is really good in Python!
I also had very much of advice from Stephan who successful the great VR design victimisation two TFT screens.
Thanks to Wayne Keenan for his Vr-Zero subroutine library. I get into't think I would have been able to implement the binocular vision event without this lib.
1 Person Made This Project!
Recommendations
-
Anything Goes Repugn 2022


Source: https://www.instructables.com/BeYourHero-DIY-VR-Immersive-Games/
Posted by: harbershonserema.blogspot.com
0 Response to "Virtual Reality on Raspberry Pi With BeYourHero! : 19 Steps (with Pictures) - harbershonserema"
Post a Comment